
 Learning how to shoot a compound bow will take some considerable patience and practice. Unless a person already has significant experience with archery, there are several steps the individual needs to master to shoot a compound bow correctly and with any amount of accuracy. For starters, if an archer is new to using a compound bow, they have to learn all of the parts of the bow and how they work. The bow parts are too much to cover a work of this scope, but for a great introduction into the anatomy of a compound bow, read ShootingTime.com’s “Parts of a Compound Bow.”
Once familiarized with the setup of a bow, it’s time to start practicing bow set up and shooting. Not all archers shoot bows alike. In mastering the steps below you can establish consistency in your form, style, and shooting accuracy.
Mechanical Release
The first step an archer takes when preparing to use a compound bow is to attach a mechanical release. The mechanical release, also called a release aid or “release,” is a piece of equipment that should not be underestimated in its importance. An archer uses the release to ensure the accuracy of his arrow’s trajectory. This piece of equipment is fitted with a trigger and allows the archer to forgo using his fingers to release the arrow. The end result of its use ensures a speedier bowstring release along with a minimal amount of torque placed on the string, thereby lending to greater firing accuracy.
An archer uses Velcro® straps and connects the release to his dominant hand. The release may be black or some are made with camouflage materials. The piece has a section that wraps around the wrist and hand, a small metal arm, and a moveable-like crimp section that grabs onto the bowstring.
Releases are manufactured in different styles: A caliber release is considered among the best options. When the trigger is pulled, it opens both sides at the same time. If the archer uses a caliber release, a loop can be added to the drawstring at a position right at the D Loop or slightly below the nocking point. The loop allows for ease of connection between the release and the bowstring. The loop, when pulled back does not establish an undesired angle and keeps the bowstring perpendicular to the arrow. When the archer pulls back the caliber release, the individual can pull the trigger with a mere motion of the finger: Doing so releases the crimp from the loop on the bowstring so that the arrow is also released.
There are three types of releases, with the caliper release most preferred over the t (Thumb) release, and the back tension. The thumb switch has a lot of moving parts making it difficult to master. It is easier to learn how to use than a back tension release. While the back tension releases are quite simple in terms of structure, the pieces are also quite difficult to use. Whatever release you choose will take practice to master.
A release is not a necessary piece of equipment since a compound bow can be fired with ease by using the fingers. Many archers prefer to use a release in an effort to thwart an unintended discharge of the arrow from the bow. The release also serves as a tool that minimizes finger discomfort. Using a release has myriad benefits. The archer will run a lower risk of dry firing and causing unintended equipment damage or self-injury. Using a mechanical release will also lend to the consistency of release. A release aid with a wrist strap serves as a way of balancing the tension produced by the pulled back bowstring between the fingers and arm muscles.
Releases with wrist triggers are the most common and are ideal for recreational shooting and hunting. Handheld T-handled releases take more finger strength to use and are more commonly used for hunting from a tree stand or when taking part in archery tournaments. Check out this Howcast video on how to put on a bow release for more information:
Nocking an Arrow
Nocking the arrow is a simple process. A nocked arrow contacts the bow at two points, the rest, and the string. This ensures that at no point during the shooting process does the arrow contact any other surface, which would send it off course.
Begin by placing the arrow on (or through) the rest. If it is a “biscuit” style rest like the one in the photo, the arrow will slide through the bristles and seat its self. With any other arrow rest, the arrow will sit atop the rest. Many archers prefer the “biscuit” style because the risk of the arrow falling off the rest is eliminated.
The nock is the portion of the arrow that attaches to the string at the nocking point. When an arrow is nocked properly, it will make contact with the compound bow in two places: The string and the rest. A properly nocked arrow is imperative as it ensures the arrow does not come into contact with any other surface or part that might otherwise deflect the direction of the arrow’s trajectory. Just above the grip of the bow is an arrow rest. The archer places an arrow through or on the rest (depending on the bow’s design). If the bow is fitted with a biscuit-style arrow rest, the arrow naturally seats itself when the archer slides the arrow through the arrow rest’s bristles. With other arrow rests, the arrow sits right on top of the rest and may fall from its position: This fact alone makes the bristle-style arrow rests more desirable.
Arrows are fitted with colorful vanes or plastic fins: These same components are imitations of fletchings made from turkey or goose feathers. On an arrow, there are three vanes, one of which is the “cock” vane or feather that rests at a 90-degree angle from the nock. The cock vane/feather is often the most colorful and vivid. The vane is also nocked so its shot remains uninterrupted by undesired contact with the bow.
The arrow should rest about 1/8 of an inch over the precise perpendicular position. Some arrows feature four fletchings, all of which are symmetrical, and so there is no special positioning of the vanes in question. When using arrows with three vanes, the archer makes sure the vane with the most vibrant colors is pointing upward. The archer then takes the end of the arrow and the plastic, pre-grooved nock, and lines it up with the compound bowstring. The nock is pressed back into the bowstring until a clicking sound is heard. If using a mechanical release with a D loop in the bowstring, the nock is centered on the string along the backside of the D-shaped loop: This is called the nocking point.
Establishing the Center Shot
Next, the center shot must be established. The archer must position the arrow in the center of the power stroke of the string: The string travel position between full draw and resting draw. The arrow must remain in front of the bowstring as the string moves forward in a straight line. Thus, the bow and bowstring must be aligned. The string is aligned with the center of the bow riser, limbs Once this is accomplished, the archer has established the center shot. For more information, see this video:
Proper Form
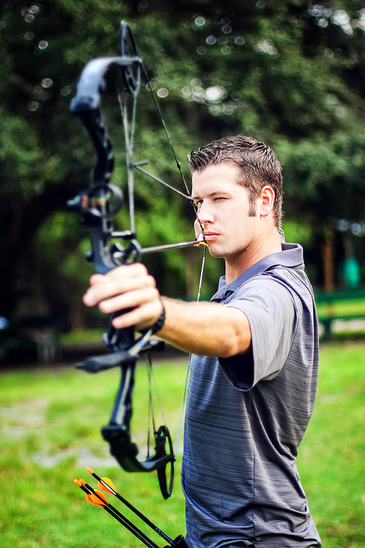 The way an archer holds the bow and the archer’s stance are important. How the archer stands in relation to where his target is located: This is archery stance and form. The archer must stand perpendicular to the selected target. The archer’s shoulder should be aimed at the target with feet shoulder-width apart. One of the shooter’s feet should be positioned a bit more forward than the other. The stance needs to be balanced and enough clearance needs to be present along the archer’s chest and bow arm.
The archer will begin with the bow in front of the body and with his fingers on the bowstring in a resting position. The shooter loads the bow with an arrow from the resting position. Before loading the compound bow, the archer always makes sure that no one is in the way or in the direct line of the bow’s path of trajectory: This helps in avoiding the possibility of accidental injury. Once in resting position, the archer can remove one arrow from the quiver and positioning the nock against the bowstring and listens for the “click.” The other end of the arrow is placed on the arrow rest. The arrow is nocked. With the arrow nocked, it’s a good time to attach the mechanical release while holding the trigger in a position that will prevent accidental firing. The center shot is established.
The Draw & Release
An archer draws up the bow so the arm holding the bow up is parallel to the earth. He pulls the drawstring straight back bringing the string toward the face, jaw, and ear while also pushing the bow out with the hand he is using to hold up the bow. An effort to rely on one’s back muscles over the arm muscles is needed, as it makes for smoother shots and a reduction in muscular strain and fatigue. In the draw position, the hand should rest lightly around the bow. Over-gripping the bow leads to excess torque and potential misfiring.
The archer must draw the string to the cheek: This is known as the anchor point. When shooting a compound bow it will take some practice, but the archer must learn how to draw the bowstring back to the same position every time the bow is used. To ensure the accuracy of the shot, archers often allow two parts of the face to touch the bowstring when it is drawn back: the nose and cheek. After achieving the appropriate stance, the shooter can align the bow’s sight on the selected target and slowly squeeze the trigger of the mechanical release. The archer will also have to follow through on the shot taken: This is achieved by remaining focused on the target ahead. If you manage to get a tight arrow pattern with repetitious shots, it means you’ve got the art of shooting a compound down to a science! For more information on the stance and the draw of a compound bow, view the following video by Colorado Outdoor Magazine:
Sources:
ShootingTime’s article website online: “Parts of a Compound Bow.”
Howcast’s Archery Lessons: “How to Use a Mechanical Bow Release.” YouTube.
https://youtu.be/Q8Y5QkC8A6w.
Howcast’s Archery Lessons: “Locating Center Shot on Compound Bow.” Youtube. https://youtu.be/FuSL4A8YU74.
Colorado Outdoors Magazine: “How to Shoot a Compound Bow.” Youtube. https://youtu.be/bPoBm7FzMXY.
Resources for further reading:
Archery for Beginners Website: http://www.archery360.com/archery-for-beginners/.
Nick Batty’s “Shooting the Compound Bow.”